Showing posts with label vegetables. Show all posts

Wednesday, June 29, 2016

growyourowncake

Some time ago I was given the opportunity to review a copy of a new-to-me formula recipe book. The book is called "Grow your own cake" by Holly Farrell, and the subtitle says: 'recipes from plot to plate'.

So basically this book promises to take you by the hand and lead you through the whole process of planting and caring for your home-grown fruit and veggies until you are ready to bake with them!
Baking from scratch and crop sounds like it gives an extra dimension to baking. Grow it, bake it, eat it!

There are fifty recipes in the hardcover book, and each is illustrated with beautiful pictures of produce and the baked goods. Recipes range from savory to sweet, using vegetables and fruit and the gardening pages are interlinked with the recipe pages so you can easily switch between the two. Very clear and helpful. The book starts with general tips and basic procedures:
Many people are convinced they do not have 'green fingers' and that any plant they attempt to grow will wilt before their eyes...


I do believe she is talking to me! Although I am a fervent baker, I am surely not much of a gardener, I simply don't know what to do.

Besides the raspberries and the apple and plum tree in our garden there should be so much more that I could grow. Probably... with a lot of help.

(This is the first year my plum tree is bearing fruit!)


Of course the book follows the seasons in the chapters: spring & summer cakes, autumn & winter cakes. Afternoon tea, pudding and savoury bakes are other chapters.

Up until now I baked one sweet and one savory recipe from this book, one a success, the other... not so much. I baked a sweet potato and marshmallow cake (page 91) which is the traditional Thanksgiving dish but is presented here in cake form instead. My family was a bit apprehensive at first but loved the end product. Then I baked pesto-potato scones... not a success, the resulting scones were tough (overbaked?) and the pesto too overpowering. But.. that being said, I think I probably need to tweak the pesto recipe a bit because mine turned out quite wet.


Besides the usual suspects such as carrot cake, courgette cake and beetroot brownies there are quite a few other recipes that use vegetables. I am planning to try of the more unusual recipes in the book such as fennel cake and the savory pea cheesecake.... Or maybe tomato cupcakes?

And that brings me to the only downside of this book, there are plenty of pictures of the gardening in the book but not every recipe has it's own image, which I normally don't mind because I can pretty much picture what is meant but for the unusual recipes I would have liked a pointer of what to expect.

As a whole I think this is an excellent book with a lovely look to it for the novice gardener who likes to try their hand at baking. I think I will longingly look at my fruit trees and raspberries and leave the gardening to someone better at that. I will bring you a cake in exchange for produce though!


 "Grow Your Own Cake"; recipes from Plot to Plate by Holly Farrell, photographs by Jason Ingram, is published by Frances Lincoln.




Wednesday, October 16, 2013

Bread Baking Babes bake a Carrot bread

Here we go again, the Babes are baking under the guidance of the sweet Heather at Girlichef and she designed a perfect challenge for busy times, it's a poolish but not too fiddly, it's a dough but not too difficult, and it produces a wonderful bread with looks!

So that's what we did, a wonderful carrot bread, with some carrot juice mixed in, a little rye and a tiger topping. My bread came out really nice and smelled wonderful but alas no tiger topping! My slathering baked up on the bread giving me a nice shiny crust but no spots at all.

I think I picked the "wrong" rice flour to make the topping because it acted strange. Later I realised this wasn't rice flour but baby rice porridge. No wonder 60 grams was so much and needed much more water. Aaargh! It took me two days to figure that one out haha.

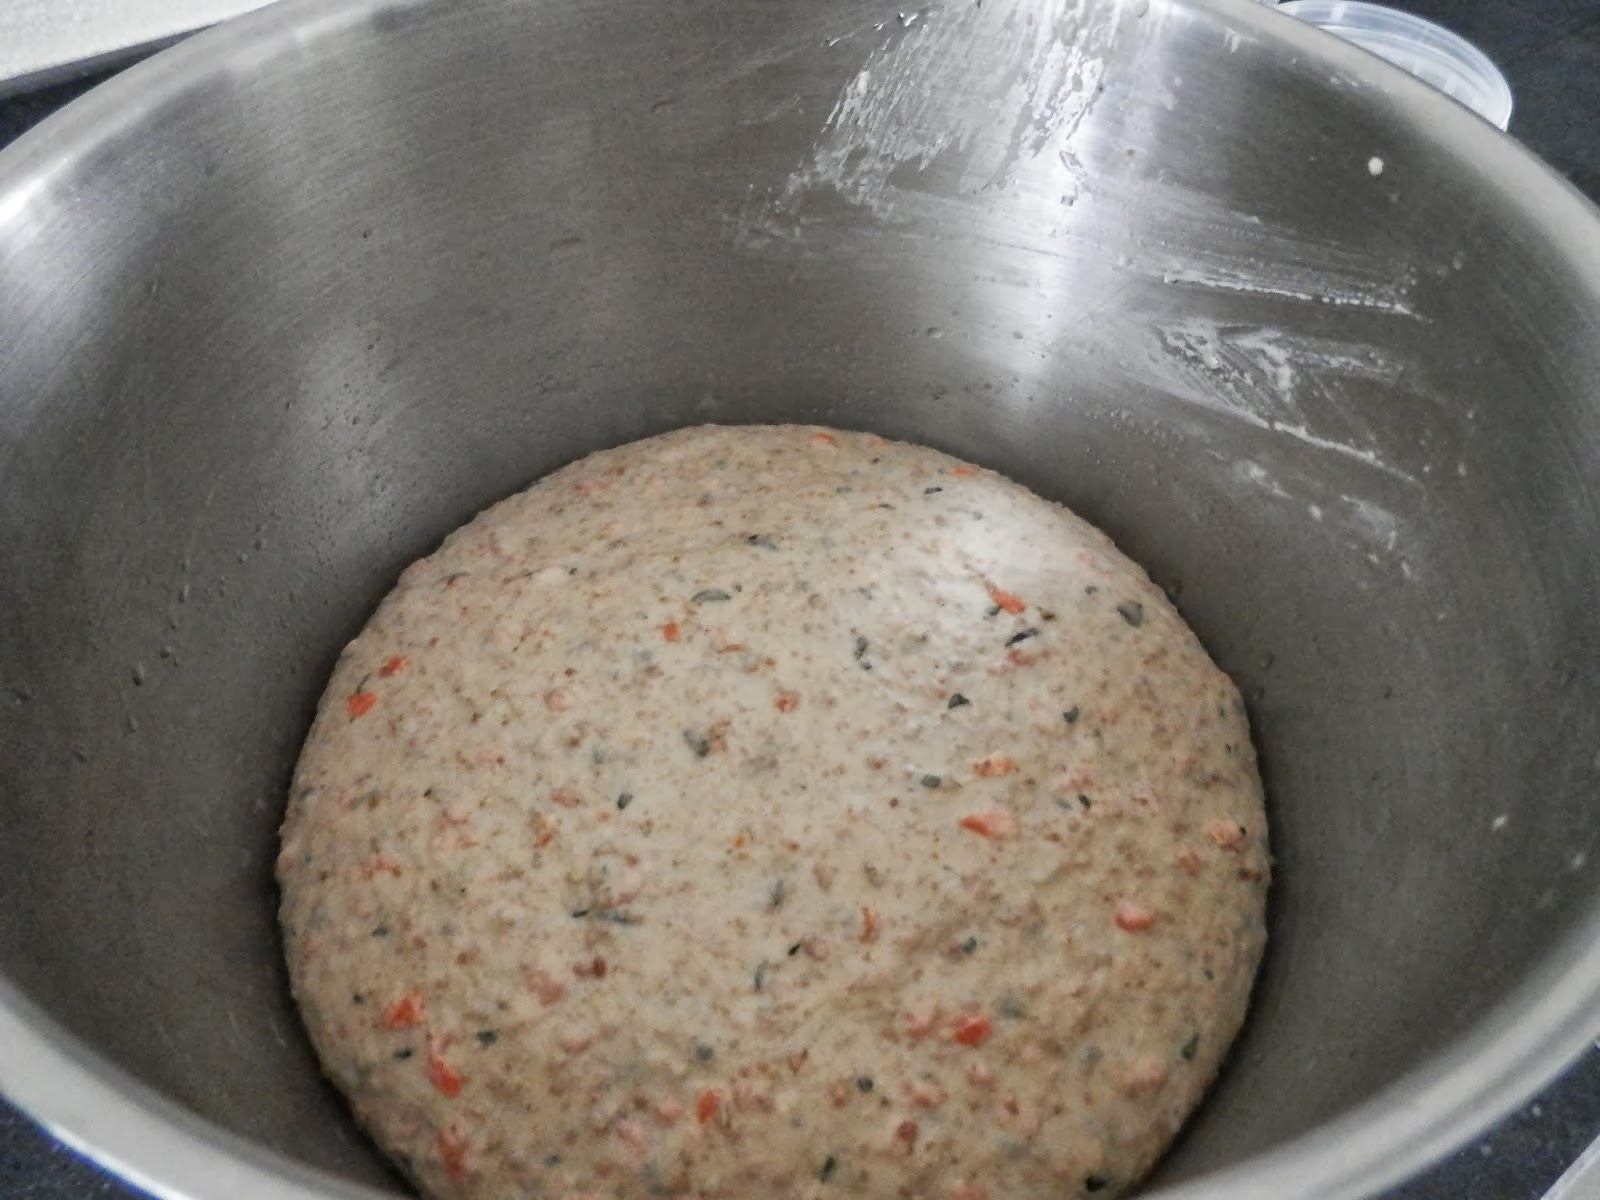
Other than that the bread behaved wonderfully! It mixed up nicely, (I even had to add  a little water but that was probably because I made a very stiff poolish). I really like the freckled inside, the carrot showed and even the green of the parsley came through.

Finally managed to get the camera connected to the computer in a way that I can actually get my pics off of it. Nice. A lot of problems are gone with the computer revamped but some new things occur and need some thinking with that fuzzy mind of mine.

All in all I think this is a winner. (Please, if you have any leftovers promise to try it toasted? Grilled Cheese sandwich? with pumpkin soup? Ladeedahdeedah....


Carrot Bread

by Heather Schmitt-Gonzalez
Prep Time: 28 hours (mostly unattended)
Cook Time: 45 minutes
Keywords: bake bread vegan dairy-free soy-free carrots flour

Ingredients (3 loaves)
    for the Poolish:
    • 3/4 teaspoon active dry yeast
    • 1 cup lukewarm water + more as needed
    • 2-1/2 cups (13 ounces / 364 grams) stone ground rye flour
    for the Dough:
    • 1/3 cup toasted sesame seeds
    • 3/4 cup toasted sunflower seeds
    • 2-1/2 teaspoons active dry yeast
    • 1 cup carrot juice, lukewarm
    • 1-1/4 cups grated carrot
    • 1/2 cup chopped parsley
    • 6-6-1/2 cups (29.4-31.8 ounces / 823.2-890.4 grams) bread flour
    • 2 tablespoons + 1 teaspoon golden syrup (or honey or maple syrup)
    • 1/4 cup sunflower oil
    • 4 teaspoons sea salt
    for the Crackle Glaze:
    • 1 teaspoon active dry yeast
    • 3/4 cup + 2 tablespoons lukewarm water
    • 3/4 cup + 1-1/4 tablespoons (4.7 ounce / 131.6 gram) rice flour
    • 2 teaspoons sugar
    • 1-3/4 teaspoons sunflower oil
    • 3/4 teaspoons sea salt
    Instructions
    Day 1: Make the Poolish
    Dissolve the yeast in the water, and let sit a few minutes to bloom. Whisk in the flour until smooth - if it is very thick, continue whisking in more water until it is the consistency of a thick batter. Cover with plastic wrap and let sit at room temperature for 24 hours; at this point it should be a bit bubbly.

    Day 2: Baking Day
    In a large bowl (or bowl of a stand mixer fitted with dough hook attachment), dissolve the yeast in the carrot juice, let sit a few minutes until it looks creamy (bloomed). Add the grated carrot, parsley, the lesser amount of bread flour, and the poolish to the bowl. Knead on low spead for 3 minutes. If the dough doesn't seem too sticky, then don't add any more of the flour; it will firm up as it is kneaded (plus you have more to add to it).

    Add the oil to the bowl and knead for another 8 minutes. Add the salt, increase the speed, and knead until elastic, about 7 more minutes. At this point, the dough will not be sticky any longer. Use the extra flour, a tiny bit at a time, to remedy the dough if it is. Add the toasted seeds, and gently mix in.

    Place the dough into a large, lightly oiled bowl or container and cover. Let sit for 60-90 minutes, *knocking the dough back halfway through. To knock the dough back, remove it from the bowl and set it on a work surface. Use your hands to knock the air out of it. Fold the edges towards the center to form a cushion. Replace in the container, seam side down.

    make the Crackling Glaze:
    While the dough is rising, dissolve the yeast in the water in a medium bowl. Whisk in the remaining ingredients. It should be spreadable, but not runny. Cover with plastic wrap and allow to sit for at least 30 minutes before using.

    shaping and baking:
    Turn the dough out onto a lighty floured work surface and divide into 3 equal parts (approximately 78 ounces of dough to equal three 26 ounce portions).

    Form the portions into three round balls, and cover them with a clean tea towel. Let rest for 10 minutes.
    Shape each circle of dough into an oblong loaf, by gently pressing ball down into a circle and then tucking/rolling into shape. Set loaves, seam side down, onto a lightly floured bread peel or thin cutting board. Glaze the loaves generously with the crackling glaze (you'll have a lot of leftover glaze), and leave to rise at room temperature for 60-75 minutes, or until the dough has doubled in size and the the surface is crackled.

    Place a baking stone into the oven, and preheat to 475° F during last 20 minutes or so of rise time.
    Slide the loaves onto the stone (let them rise directly on a baking sheet or two if you don't have a stone - slide that into preheated oven) and spray generously with water. Close oven door. Lower the temperature to 400° F after 5 minutes. After another 10 minutes, open the oven door to let in a little air. Repeat two more times (every 10 minutes). Total baking time will be 45 minutes.

    Remove bread from oven and cool on a wire rack.

    if you'd like to join in and be a Bread Baking Buddy, simply bake this Carrot Bread (yes, you may adapt) - and then send Heather a link to your post via email (girlichef at yahoo dot com) or leave it in the comments section of her post.  Submissions are due by October 29th.  Once you've posted, you will be send a Buddy badge for baking along.  I hope you'll join us this month!

    Please click to see how my fellow Babes did this month!
    Bitchin' Bread Baking Babe Bibliothécaire - Katie
    blog from OUR kitchen - Elizabeth
    Feeding my enthusiasms - Pat
    girlichef - Heather
    Life's A Feast - Jamie
    Living in the Kitchen with Puppies - Natashya
    Lucullian Delights - Ilva
    My Kitchen In Half Cups - Tanna
    Notitie Van Lien - Lien
    Paulchens Foodblog - Astrid


    Saturday, February 16, 2013

    Assyrian Spinach Pies to celebrate Bread Baking Babes

    Celebrate because it was 5 years ago Tanna and I toyed with the idea to gather baking friends and start baking together as a group. Base thought was to keep it small and intimate, to stir ideas around, to be able to have flour talks like other women discuss shoes (“do you think these heels make my ankles look fat?” translates into “when I bake this bread and retard it do you think I need to add more water due to the coarse rye flour?”). Throughout the years we found great gals, bread Babes in the kitchen but maybe even more importantly Babes at heart. The love for messing around with dough is imminent but also we found that these Babes were also a no-rules attached group of Friends, there’s always at least one of them there when you need them to vent some steam, to bitch around, to cry or to exchange silly jokes. Shout or whisper, someone will hand you that much needed bottle, the hankie, the colored jokes. A great group. And we bake!


    P2150803

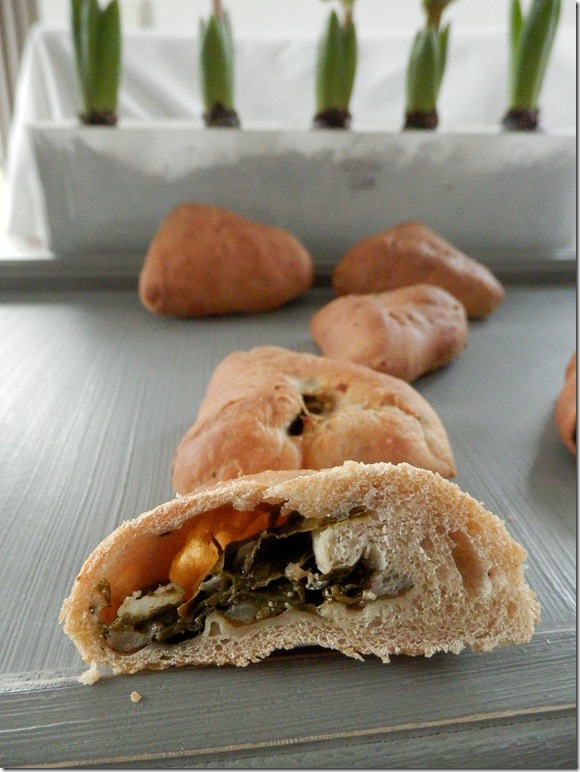
    This month Tanna provided us with a recipe for Spinach pies. Pies as in savory hand held bites originally filled with spinach and cheese but they lend themselves to every filling imaginable. I jumped at the spinach filling because I do like my spinach, then add some real feta and let my thoughts roam around for added extra’s. I thought of adding red pepper and raisins… then turned to that lonely can of figs in the pantry!
    So in my bowl with filling I had this:


    Filling idea

    450 gr chopped raw baby spinach (chopped my adult spinach roughly, should have chopped more)
    3 chopped canned figs
    pinch of lime juice,
    3 chopped caramelized garlic cloves
    1/2 tsp dried red pepper flakes
    1 tbs honey
    75 gr chopped walnuts
    200 gr crumbled feta
    salt and pepper


    Dough
    1 tablespoon active dry yeast, (2 1/4 teaspoons)  = 1 package
    2 cups warm water (105° to 115°)
    1/2 teaspoon ground mahlab (I know I had it somewhere, couldn’t find it so I added 1 tsp za’tar instead!)
    5 cups unbleached all-purpose flour plus more for kneading, use some white whole wheat next time
    1 large yellow onion, chopped and sauteed
    1 tablespoons granulated sugar
    2 teaspoons salt
    1/3 cup olive oil (I used about 50 grams)

    Then this dough, I didn’t think, just followed the recipe as is; resulting in a wonderful silky very sticky dough. A great dough really. To use in jelly roll fashion. As it turned out not suitable to make the circles of dough to fill and pinch together and make savoury pies. I tried rolling out 50 grams balls of dough. Didn’t work. The stuff held on to the counter as if it was fearing for it’s life. Then I tried rolling out a rectangle and armed with a big round cookie cutter tried to cut rounds…. Uhuh. Good thinking, too bad that didn’t work either. Flour flew, curses flew, rolling pin tossed to the side. I shaped more or less round disks of dough, held in the palm of my hand and stuffed the filling in, then pinched the sides together forming a triangle with raised edges. Beautiful. Upon baking the dough (being the wet dough it was) rose and cleared the carefully shaped ridges completely. Puffy bread filled with spinach. Excellent.

    Leftover pies can be frozen. When cool, arrange them on a baking sheet and freeze until solid. Transfer them to heavy-duty resealable plastic bags and freeze for up to 1 month. To reheat, thaw the pies in their wrapping, then set them on a baking sheet and pop into a preheated 350°F oven for 10 minutes. Serve warm or at room temperature.

    P2150800

    After 6 of those I thought: Stuff It!! and shaped the rest of the dough in a ball, baked a boule. LOL.

    Now.. what I should have done in the first place was “watch while knead”. Lesson #1 of baking bread. I didn’t. I assembled all ingredients in the bread machine for easy kneading, closed the lid and went merrily on with other stuff. Lesson #2 of baking bread: hold back on some of the water, especially with US recipes only add some if need be. Now I was left with that bowl of lovely looking, great smelling spinach filling. And I still needed dinner. So I cooked pasta, tossed the rest of the filling in a big pan with olive oil and quick stirred it with a little cream…. Bliss on a plate! Lovely dinner. I won’t tell you about two boys meticulously picking out all walnut pieces before proceeding to eat. I also won’t tell you about the gagging sounds they made when they discovered they missed a piece. I do love my boys. Pity they don’t love their walnuts as much as I love them.


    P2150802

    Heart shaped Spinach pie. Cute!
    Please check the cutesy Babes as well; they filled and formed each in their own way. Our differences make a whole:


    Bread Baking Babe Bibliothécaire – Katie
    blog from OUR kitchen – Elizabeth
    Feeding my enthusiasms – Elle
    girlichef – Heather
    Life’s A Feast – Jamie
    Living in the Kitchen with Puppies – Natashya
    Lucullian Delights - Ilva
    My Kitchen In Half Cups – Tanna
    Notitie Van Lien – Lien
    Paulchens Foodblog – Astrid
    Provecho Peru – Gretchen

    For complete details about this month’s recipe, the BBB and how to become a BBBuddy, please read:


    Technorati Tags: ,,

    Monday, August 13, 2012

    Holiday greenery

    2012 Vakantie Pyreneeen 010

    Who needs soggy take away meals from the camp site’s  when you can make something like this in 10 minutes? Fresh greens from the market, tomatoes ditto, tuna, walnuts and an apple. Fry up your old french bread in some olive oil flavored with herbs and garlic…. Dig in!


    Also in the spirit of green… what’s with boys and trees anyway?


    2012 Vakantie Pyreneeen 059  (Son no.1 up a tree in Gorges de Caranca)


    2012 Vakantie Pyreneeen 128 (Son no. 3 up a tree at the Pic de Canigou)


    2012 Vakantie Pyreneeen 129

    (Son no. 2 on his way up at Pic de Canigou)

    Friday, February 24, 2012

    Lacy Coconut Milk Pancakes {There's a hole in my bucket}

    Name that song!


    We travel to Penang for dinner and tonight oldest son and I have been trying our hands at Roti Jala {Lacy Coconut Milk Pancakes} and there was supposed to be some handiwork involved hence the hole in the bucket...


    Again we are baking a recipe from Flatbreads & Flavors and match it with another one (or two…) from the book, providing a full meal for the family.

    See, to make the pancakes lacy, the thin pancake batter is poured in a slow swirling motion onto the hot pan. Using a roti jala pourer. Right. A Roti Jala Pourer can be made by punching six holes in the bottom of a tin can; pour the batter in and swirl away! Believe me, I was all set to use the coconut cream can to punch holes in and then Elizabeth came to the rescue by using a squeeze bottle!
    HAH! Justified. Running for the squeeze bottle!


    To accompany the pancakes we made Gulai Ayam {Coconut Milk Chicken Curry} a mild curry where you roast fresh ground spices, combine them with a peppers/shallot/ginger/garlic/nuts paste and then slowly simmer with coconut milk. For me this was a tad too bland (I forgot to add the salt and maybe I added too much coconut milk) but the flavours were promising. Also the smell of the roasted paste and spices is just heavenly.
    Then I decided we needed something crispy as well and quickly put together the Four Thread Salad (page 88). Another chapter in the book and a different continent altogether but this salad was the jackpot of our dinner! A lovely combination of vegetables (very adaptable) and the dressing is salty with a kick.

    I think for this occasion I’m allowed to post a recipe from the book, slightly adapted to suit my pantry.

    Four Thread Salad
    (Flatbreads & Flavors, Jeffrey Alford and Naomi Duguid)
    2 oz Mung bean threads (or cellophane noodles/glass noodles)
    (prepare according to package directions)
    1/2 pound carrots, scraped and julienned
    1 tsp salt** (didn’t use)1/2 tsp sugar (didn’t use sugar)
    1  English cucumber (peeled, deseeded, julienned)
    2 to 3 scallions (julienned both green and white)
    * added a green bell pepper also julienned
    * added a bunch of crunchy deep fried mung bean threads on top

    Dressing1 large clove garlic finely minced
    1/4 tsp salt  (I really don’t think you need this with the soy sauce already being salty!)
    1/4 tsp ground Sichuan peppercorns
    3 Tbs soy sauce
    1 Tbs rice vinegar
    1/2 tsp roasted sesame oil
    1/2 tsp dried chile pepper flakes

    Medium sized bowl, colander, small bowl

    **Note re the salt in this recipe:  my son put this together and I think he did follow the recipe in the book (he is out now so I can’t ask him) but we all thought this was a tad salty. So next time I will leave out all added salt and taste first before adding.

    Put sliced carrots in the medium bowl.

    Use half of the tsp salt to sprinkle the sliced cucumber and toss. Let stand for 15 minutes, rinse briefly under cold running water and squeeze to drain. (Eh Oops? I didn’t do this at all! I just peeled, deseeded and sliced the cucumber. Yes, it was quite wet, so do as I say and not as I did!)

    Add to the carrots in the bowl. Stir in the drained (and if you like cut to 2 inch lengths) mung beans and the sliced scallions and stir to combine. At this point I added the sliced green bell pepper as well.
    Mix all the ingredients for the dressing together in the small bowl. Pour over the salad and toss gently to coat. Serve at room temperature. The authors state that this salad taste best serves an hour or two after is has been dressed, also you can prepare ahead and refrigerate to serve later. Make sure you let it get to room temp again.

    Just for fun and extra crispness I deep fried a bunch of noodles and arranged them on top. My kids love that.  They swell up and get all crispy in funny crinkly shapes (eeh… the noodles, not the kids!!!)
    You know what?? I would love to try this salad sans dressing in rice paper wrapping and use the dressing as a dip. Or use lettuce leaf, roll up and dip. Oh boy I think I’m on to something. Maybe add slivers roast beef to it? Shrimp?

    Wooha! I forgot I made my sweet and sour cucumber as an extra side dish! Easy peasy and so good.
    Use another peeled deseeded cucumber sliced in thin half moons. Make a sugar syrup using 3 tbs water in which you dissolve 2 tbs sugar and reduce to a syrup. From the heat add 2 tbs (a splash ;-) white wine vinegar, pour over the cucumber and let cool.


    Saturday, March 26, 2011

    Turkish Feta And Spinach filled filo pastry

    IMG_3454 

    It’s been a while since I made these and I didn’t want to post because of the lack of better pictures. See, I made them spur-of–the moment while cooking dinner and it was already dark when they were out of the oven.

    No real recipe either but you can find similar pastries on the Internet.

    I used:

    450 gr frozen spinach squeezed dry
    1 egg
    300-400 gr feta cheese, crumbled
    pepper, salt, thyme
    couple of dried tomatoes, chopped
    1/2 tsp chili pepper (Aleppo)
    1 tbs lemon juice
    1/4 cup dried breadcrumbs

    1 package ready made filo pastry, I think it was 750 grams. I got mine from the Turkish shop, sealed and chilled but not frozen. (I hate frozen filo pastry, the ones I get are either dried out at the edges or clinging together, this one was great to work with).

    Mix all the ingredients for the filling, The egg is there to keep it all together, and I included the breadcrumbs to make sure if there was any liquid left in the spinach it was taken care of. Would have used fresh but frozen was what I had on hand.

    The process of the triangle fold was a pleasure once I had it down to a routine. My filo dough came in long rectangles and I sliced them lenghtwise in three equal strips. Proceeded to brush half of each strip with melted butter (lengthwise) and folded the unbrushed part over the buttered part. This left me with one long narrow strip.
    Placing a tablespoon of the filling on the bottom left hand side of the strip it was a matter of fold over, aligning the edges as I go. Flop, flop flop and ready!

    This is what I did. Mind! These are not my pictures, they are from here! And there’s a written instruction as well.

    Friday, February 04, 2011

    Gevulde pasteitjes / Cornish pasties

    IMG_3195 En toen was mijn hele post weg! Als je niet saved en je laptop valt uit? Dan is het weg. Gaan we nog een keer maar dan wat minder uitgebreid als je het niet erg vindt. Recept heb ik hier vandaan geplukt en eigenlijk alleen de ingrediënten van de vulling aangepast aan wat ik op dat moment in huis had.
    Voor het geval je in paniek raakt… het deeg is voldoende voor 4 grote pasteitjes, maar ik heb anderhalf keer het deeg gemaakt en vervolgens kleinere stukjes deeg genomen per pasteitje… jaaaa om het simpel te houden!  Nou ja, maar dan weet je in ieder geval waarom ik er meer dan 4 heb liggen.
    Het deeg zit supersnel in elkaar en de vulling kun je voordat je het deeg maakt al snijden en zover klaarzetten. (Of uit de koelkast plukken ingeval van restjes). Het deeg hoeft niet te rijzen dus je kunt in één keer door.

    IMG_3198 Cornish Pasties
    Het deeg:
    385 gr patent bloem
    1 tl. salt
    85 gr. margarine
    85 gr. boter
    170 gr water
    De vulling:
    250 gr vlees (fijngesneden bieflapjes, restje stoofvlees/rul gebakken gehakt) *
    250 gr groenten zoals wortel, selderij knol in dobbelsteentjes
    2 of 3 kleine aardappels in dunne schijfjes
    1/2 ui, in dunne ringen
    1 prei, ook in dunne plakjes
    2-3 tl verse tijm (gedroogde oregano of herbes de provence kan ook)
    25 gr blauwschimmelkaas zoals bijv. stilton of gorgonzola (gewone kaas mag hoor!)
    zout en peper

    Dan nog:

    - extra bloem voor het werkvlak
    - 1 ei plus 1 el melk klutsen om de deegpakketjes mee te bestrijken.
    - Oven voorverwarmen op 200 C (hetelucht).

    * het vlees voor de vulling kan gewoon rauw, vind het alleen in geval van gehakt niet handig maar als je geen restjes gebruikt kun je gewoon rauw fijngesneden mager rundvlees gebruiken.


    ~~~~~~~~~~
    IMG_3192Gebruik ofwel de keukenmachine met het mes of je handen.
    Bloem en zout mengen, kleine blokjes boter en margarine toevoegen en doorknijpen/wrijven zodat het kleine klontjes vormt. In de keukenmachine: puls met korte stootjes totdat het lijkt op nattig grof broodkruim, dit overdoen in grote kom.
    Water toevoegen en met een vork omscheppen totdat alles bevochtigd is. Met koele handen vlug in een bal vormen (niet teveel kneden). Dan op een licht bebloemd werkvlak uitrollen. Opvouwen, kwartslag draaien en weer uitrollen. Doe dit nog 2x.
    Zoals Kelly zegt: geen paniek, je maakt geen bladerdeeg!
    Verdeel het deeg in 4 gelijke delen en zet apart.
    Je hebt de ingredienten voor de vulling al klaar staan. Toch?
    Rol een stukje deeg uit tot een rondje van ong. 20 cm.  Laagjes maken door te beginnen met een paar aardappelplakjes aan één kant van het deegrondje. Dan volgen de blokjes groente, de ui, de prei en het vlees als laatste.
    Strooi wat thijm, zout en peper erover en iets bloem. Nog wat van de blauwschimmelkaas erover (een paar krummels).
    IMG_3193Strijk met je vinger wat water langs de rand van het deeg, pak dan de ene kant van het deegrondje op en leg die over de vulling op de andere kant. Til voorzichtig op bij het randje (vulling schuift nu wat naar onder en je hebt eigenlijk een zakje vast) en knijp de randen goed vast. Je kunt een mooi randje maken bovenop door een draaiende knijp beweging te maken zodat het deegpakketje eruit komt te zien als een stegosaurus. (briljante observatie van Kelly! lol).
    Zet het pakketje op een bakplaat en bestrijk met het eimengsel. Doe dit voor alle pakketjes. Maak als laatste met een mes een sneetje vlak naast de top zodat evt stoom kan ontsnappen.
    Bak ong. 25 minuten tot goudbruin. Heerlijk!
    Poehee… wat een verhaal! Maar weet je… het valt echt reuze mee. Het lijkt een heel gedoe maar het is lastiger opschrijven dan maken. Heus. Beloof ik. En dan ga ik nu even kijken of ik dat superhandige filmpje kan vinden zodat je kunt zien wat ik bedoel.
    JA! Hebbes!  Geweldig; Oma maakt pasteitjes… “me lard an’ me butter”
    en bij deze kun je zien hoe de vulling wordt gestapeld en de rand wordt geknepen.IMG_3194

    Saturday, December 04, 2010

    Nationale Anti Pakjes Avond / Half gekonfijte tomaten

    napa De wát? Toen ik de oproep in het mailtje van Karin las gingen mijn haren al recht overeind staan. Dat is ons nationale erfgoed! Waarom moet Sinterklaas avond, pakjes avond nu ook al in de ban?
    Adem in, adem uit…. doorlezen Baking en dan tot de ontdekking komen dat dit helemáál niet gaat om het uitbannen van pakjesavond maar om het uitbannen van pakjes. Pakjes en zakjes die ons door slimme fabrikanten door de strot geduwd worden om toch maar authentiek te kunnen koken zonder enige moeite.

    Nou moet ik eerlijk zeggen dat het me eigenlijk niet zoveel uitmaakt wat jij doet, ga gerust je gang maar verklaar mij dan niet voor gek als ik het anders doe. Ik geloof dat dat mijn grootste griebel is wat betreft dit onderwerp. Heb je dat helemaal zélf gemaakt? Jij bent gek! Hoezo dan… Ik ga jou toch ook niet uitlachen als je traint voor een marathon terwijl ik denk joh, 40 kilometer doe je veel sneller met de auto?

    Leuk artikel over dit onderwerp trouwens vandaag in de zaterdag editie van het NRC, zowel in de receptenrubriek van Marjoleine de Vos als in Opinie en Debat (“Er gaat niets boven een kant- en klaar-maaltijd met additieven”)

    Wat koop je dan eigenlijk? Gemak? Zekerheid? Vertrouwen? Of smaakversterkers en verdikkingsmiddelen? Wie een pakje open kan maken kan koken? Weet je, wie kan lezen kan ook koken, echt waar.
    Oh en mag ik even? Even mijn allergrootste ergernis?  PANNEKOEK MIX! Echt de stomste uitvinding aller tijden. Je koopt een pak pannenkoekmix en daar moet je dan nog eieren, melk en boter aan toevoegen.
    Pardon?
    Dus je koopt eigenlijk bloem. Toch? Heb je al eens op de ingrediëntenlijst gekeken? Daar staat dat zo’n pak bestaat uit: tarwebloem, rijsmiddel (lees bakpoeder. hoeft niet eens maar mag wel), suiker en boekweitmeel (wordt in zo’n zelfde pak verkocht vlakbij in het schap).
    Vraag me af of er ook niet naturelle pannekoekmixen zijn… vanille misschien? Drupje vanille-extract erdoor. Kaneel? Vleugje gemalen kaneel erdoor. Enz. enz.

    Maar goed, deze tomaatjes kun je ook kopen in de supermarkt, die zitten per 6 (per zes!!) verpakt als amuse of tapas…. Kun je een ruig feestje mee geven lijkt me. Maak ze zelf eens. Heus erg makkelijk.

    IMG_3161 Recept:
    (naar Michel Roux: Pastry; geweldig boek!)
    1. 1 liter lichte olijfolie
      1 kg rijpe –kers- tomaatjes
      2 takjes tijm
      1 laurierblad
      2 tenen knoflook (ongeschild, gehakt en gehalveerd)
      15 gr witte peperkorrels, grofgestampt
    Verhit de olie in een grote pan en doe er de hele ongepelde tomaten, de tijm, laurier, knoflook en peper in.

    Verhit alles 5-10 min op ca 70 grC. Hoe rijper en kleiner  de tomaten des te korter de verhitting. Die 70 graden klinkt erg eng en zou je kunnen doen met een thermometer. Is niet echt nodig, zet die pan op een middelhoog vuur, de olie mag absoluut niet koken of bubbelen en je zou je vinger er heel kort in kunnen houden. (Vinger erin, au toch wel heet. Dan is het goed)
    Laat in de pan afkoelen, doe ze over in een afsluitbare pot of schaal en giet de olie erover. Zet afgedekt tot gebruik in de koelkast. (Minstens 2 weken houdbaar, mits luchtdicht verpakt onder de olie en in de koelkast).IMG_3133
    En dan? Wat doe je er dan mee? Nou, echt van alles! Je zou er bijv. een perfecte tomatentaart mee kunnen maken, of mini-varianten zoals hieronder voor een feestje. (Hier had ik de velletjes toch even verwijderd voor het bakken). Heerlijk door een salade, erg lekker om als het vlees nog even door moet garen een paar van deze tomaatjes in de jus te leggen… Als extraatje op het laatst door je pastagerecht? Kortom eindeloos in variatie. Gewoon met een prikkertje bij de borrel is ook prima. Dit kun je dus ook doen met bijv. paprika.
    PS: zoonlief meldt dat ze ook erg lekker zijn op de boterham, met kaas.
    IMG_3137
    Eh volgens mij heb ik hier al vaker over gemopperd… echt waar? Ik geloof het wel…
    Nog meer lekkers en simpel?
    - gecaramelliseerde uitjes (die van “op een bedje van”)
    - (saaie) groente oppepper
    - feta smeersel voor op een toastje

    Voor alle duidelijkheid; ja, er zijn wel wat pakjes in mijn huis te vinden, ik heb altijd custard poeder in huis (joepie! troosteten!) ben niet vies van bouillon blokjes, maizena zit in een pakje en gelatine poeder ook, en eh oeps er staat ook een wanhoops-pakje allesbinder (ha! over verdikkingsmiddelen gesproken grijns) , en ik gebruik bonen in blik voor mijn chili. Oh en natuurlijk tomaten in blik en tomatenpuree dûh!

    De anti-pakjes discussie is eventueel ook te volgen op Twitter: #NAPA
    al met al heeft Karin er een leuke tamtam van gemaakt, plus extra reclame voor haar boek, de rubriek in Trouw en haar site. Slim!

    Wednesday, August 18, 2010

    Flaky! Tomato Tart

    IMG_0929Not me, my crust. Very flaky and delicious. Better still, it was whipped up in minutes. No chilling the dough, no patching an unwilling crust.

    Easy. As pie.  (Although I’m afraid that when I do make it again I will fail terribly. It has happened before). Until then we were very happy to have this for a light dinner. The filled French Bread you see on some of the photos was geared towards the picky eater son. He was as happy with it as we were with the tart.

    Husband noted that it was more filling that it looked. Which in his opinion is a good thing. I can totally see this for when you have company for lunch, or in small slices served as an appetizer.

    A perfect crust to use for all kinds of idle vegetables, and equally good I think to use for sweet fillings as well. Husband thought it was a tad too sweet for a hearty filling… (I’m not so sure but I kind of understand where that comes from).

    Got the recipe from a trusted source and totally followed it as written including the higher temp in my convection oven. I was a bit worried about the tomatoes spilling liquid and thus a soggy crust. Didn’t happen. Might be that the Dyon mustard prevented that.IMG_0926

    Tart Filling

    One unbaked tart dough (see recipe, below)
    Dijon or whole-grain mustard
    2-3 large ripe tomatoes
    2 tablespoons olive oil
    salt and freshly ground pepper
    two generous tablespoons chopped fresh herbs, (thyme/chives/tarragon)
    8 ounces (250 g) fresh or slightly aged goat cheese, sliced into rounds
    Optional: 1 1/2 tablespoons flavorful honey

    (I used what I had on hand, fresh parsley and basil, plus freeze dry lemon thyme, drizzled a little honey, and used mozzarella instead of goat chees although I think the goat cheese adds some more spike to it )

    Tart Dough

    1 1/2 cups (210 g) flour
    4 1/2 ounces (125 g) unsalted butter, chilled, cut into cubesIMG_0931
    1/2 teaspoon salt
    1 large egg
    2-3 tablespoons cold water

    1. Make the dough by mixing the flour and salt in a bowl. Add the butter and use your hands, or a pastry blender, to break in the butter until the mixture has a crumbly, cornmeal-like texture. (I went the easy way and used the pulse button on my Magimix)

    2. Mix the egg with 2 tablespoons of the water. Make a well in the center of the dry ingredients and add the beaten egg mixture, stirring the mixture until the dough holds together. If it's not coming together easily, add the additional tablespoon of ice water.

    3. Gather the dough into a ball and roll the dough on a lightly floured surface, adding additional flour only as necessary to keep the dough from sticking to the counter.

    4. Once the dough is large enough so that it will cover the bottom of the pan and go up the sides, roll the dough around the rolling pin then unroll it over the tart pan. "Dock" the bottom of the pastry firmly with your fingertips a few times, pressing in to make indentations.

    5. Preheat the oven to 425ºF (218ºC).

    6. Spread an even layer of mustard over the bottom of the tart dough and let it sit a few minutes to dry out.

    7. Slice the tomatoes and arrange them over the mustard in a single, even layer. Drizzle the olive oil over the top.

    8. Sprinkle with some chopped fresh herbs, then arrange the slices of goat cheese on top. Add some more fresh herbs, then drizzle with some honey, if using.

    9. Bake the tart for 30 minutes or so, until the dough is cooked, the tomatoes are tender, and the cheese on top is nicely browned. Depending on the heat of your oven, if the cheese doesn't brown as much as you'd like it, you might want to pass it under the broiler until it's just right.IMG_0937

    Tuesday, January 26, 2010

    You have Naan? I have a dinner (1), Onion Bhaji, Cucumber raita

    So what did we have with our Naan?
    From the top right: chicken balti, tandoori chicken, onion bahji and Saag Paneer Palak Paneer in the center.

    During a Skype session Tanna suggested Saag paneer (which in effect became Palak Mozzarella... center of the plate), I found some long forgotten Tandoori spices in the pantry and made grilled chicken Tandoori.
    I remembered a cookbook featuring all kinds of Asian dishes, and while I told Tanna that I never had anything like Saag Paneer I flipped the pages to find a recipe for it! Right there in a book I've had for ages.

    Paneer being a firm cheese, the Palak stands for spinach and spices. Ok, that settled it. Timewise I substituted mozzarella for paneer. Both Husband and I didn't like the way it looked, didn't like the way it smelled. We tentatively took a bite.... Not bad at all! Paired it with Naan... delicious! Between the three of us (oldest son helped) we polished off the entire bowl.

    I gladly refer you to Tanna for the recipe, I used the one I found in the book but as certified sources have it that one should be called Palak Paneer because it uses spinach. Saag Paneer is made with mustard greens... I think I'm confused. Maybe not. But it's good and you should try!

    Next I made Balti chicken (recipe follows soon), fairly mild to accomodate the twins, they loved it!

    A lonely cucumber I found transformed into cucumber raita, simple but a delicious aside.
    Cucumber Raita

    2 cucumbers, peeled, deseeded and chopped
    200 ml -thick- yoghurt
    1 tsp cumin seeds
    1 tsp mustard seeds
    1/2 tsp grated gingerroot
    salt and pepper
    paprika for garnish

    Roast cumin and mustard seeds in a dry frying pan until fragrant. Mix cucumber with yoghurt and spices plus gingerroot. Add salt and pepper to taste. (Quickly scatter some aleppo chili flakes in before anyone notices hehe). Serve!


    Something else I made were little onion fritters, not entirely sure how I think about them though, in potential these sound delicious but I detected a hint of something strange. My oil? The chick pea flour too old? I do know I want to try again because as I said in potential... yum!

    Recipe Onion Bhaji (onion fritters):

    80 gr besan (gram flour/chickpea flour)
    60 gr ap flour
    1.1/2 tsp baking soda (baking soda is what they said, maybe I should have used baking powder?)
    1 ts ground chili
    1 egg
    3 dl water (add as you see fit, you'll want a thick batter, this is way too much)
    4 large onions, peeled and sliced in rings
    4 garlic cloves, chopped
    oil for frying (I used sunflower seed oil)

    Sift flours, baking soda and chilipowder in a bowl, mix egg and water and add to whisk into a thick batter. Add garlic, whisk and finally add the onion.

    Heat 1/2 to 3/4 inch of oil in a large frying pan and make small "pancakes", using approx. 2 tbs of batter for each fritter. Fry on each side until golden and done. Leave to drain on paper towels and serve as hot as possible with mango chutney or chili sauce. (Or cucumber raita!).

    Enjoy!

    Thursday, January 14, 2010

    Bits and pieces


    are usually all that's left. Have you ever wondered why there are people (plural) in my house who

    - eat cookies but never eats the whole package leaving one or two?

    - Or eat all the whole ones not touching broken pieces?

    - Snacks on dates and leave three lonely ones in the box?

    - Shares and eats all chewing gum but one?

    - Eats 6 poached pears, snacks on them in passing but looses interest for the last three in the bowl?

    Beats me!

    Thursday, October 15, 2009

    Nice pumpkin soup


    Is there a need for nailing a pumpkin soup that gets the family thumbs-up when you live in Holland? Where pumpkins are on loan from the United States and only seen as decoration? Not the carved kind, not yet, we haven't fully embraced Halloween here but pumpkins are inching their way into windowsills, out at the front door or amiably dressing the deserted garden furniture.

    Once or twice a season I buy pumpkin just to try. I made pumpkin pie (family: meh why bother?) soup (equally dismissed as too earthy, could be nice but it's just bland). Stubbornly I tried again, bought another one. Not sure if it was the variety, the fact that it was organic or the recipe but this pot of soup was emptied in no time. Everyone liked it! I was as surprised as you are. Now to remember what I did....

    First of all the variety; a deep orange, smallish, organic one, found at Lidl €1,99. I saw it advertised as a Japanese kind a hokkaido?

    Second: I peeled -using a vegetable peeler-, cubed, sprinkled with olive oil, cumin, flecks of dried ancho chillies, roasted in the oven. Lovely fragrant smells emanating from the oven! (Note to self:...use it as side dish?)

    potatoes
    lime juice!!
    salt and pepper

    1 hokkaido pumpkin, peeled, cubed
    1 tbs cumin (less of the ground variety, 1 tbs of whole cumin seeds)
    sprinkle of dried ancho chili flakes

    Preheat oven to 400F/200C. Toss pumpkin cubes with olive oil, cumin and chili flakes in a roasting pan and roast for about 45 minutes or until nice and tender.

    1 tbs olive oil
    2 onions, chopped
    1 large carrot, peeled, chopped
    2 garlic cloves, chopped
    1.1/2 - 2 liter vegetable broth
    2 large potatoes, peeled, cubed

    finish:
    squeeze of lime juice
    1 tbs toasted sesame seeds
    pepper/salt

    Heat olive oil in a large pot and softly saute/sweat garlic, onion and carrot, covered until soft and fragrant. Add the roasted pumpkin and the potatoes, toss and saute for a couple of minutes more. Add broth and bring to a soft boil to get the vegetables soft and tender approx. 15 minutes. Puree using a vegetable mill or a hand held blender and taste to add pepper and salt if needed, squeeze in some lime juice.
    To serve with a sprinkling of sesame seeds and some nice artisan bread.

    Happy Halloween!

    Another pumpkin soup using mustard, cinnamon and creme fraiche

    Friday, October 02, 2009

    Sweet and sour vegetables with pork

    There it is! The other half of the pineapple, and I kept my promise to post soon! Lots of colour, lots of crisp veggies and a little bit of meat. It's usually the other way around in these kind of dishes but I just happen to love the colours and soft crunch. It made me feel very adequate, adding all these vitamins and fibers to the kids diet. Although I'm not complaining, they do eat a fair amount and all kinds of vegetables. Granted, I frequently found myself in a clash of wills, losing my patience more than once in the process of teaching them to eat -almost- everything. "Yes this is good. It's red but it's good. Sure you can eat red vegetables." Aaargh!! (Beetroot, cabbage).
    For this dish I used the fresh pineapple cubes that were not used here and the juice I saved. However, there's no problem with using canned pineapple.

    Sweet and sour vegetables and pork

    approx. 8 ounces pineapple in cubes
    1/2 cup syrup / pineapple juice
    1 Tbs corn starch
    1-2 Tbs plum sauce/tomato ketchup
    2.1/2 tsp nam pla (fish sauce)
    1 Tbs brown sugar

    1 Tbs vegetable oil
    10 ounces lean-er pork in thin slices

    1 Tbs vegetable oil
    2-4 garlic cloves, chopped
    1 large carrot, in slices
    1 medium onion, in thick slices
    1 red bell pepper, cubed
    1 small cucumber, halved, deseeded, in thick slices. No need to peel when the cucumber is young.
    cherry tomatoes... 5? 10? Whatever you like

    For garnish: dry roasted cashew nuts and cilantro!!

    (there's a hole in my brain that hides the translation of cilantro. In Dutch it is called koriander, in English it's called coriander as well for the seeds but cilantro for the leaves?)

    In a small bowl mix syrup with cornstarch, add plum sauce, (or ketchup if you can't find any, it's different but will do) fish sauce and sugar to a smooth paste.
    Heat oil in a wok and fry the pork until it's coloured, use a slotted spoon and transfer to a plate with kitchen towels to get rid of excess fat/oil.
    Add oil if needed and fry garlic, when that has colored add carrot, onion, bell pepper and fry for another 2 minutes.

    Tip in cucumber, pineapple, tomato. Stir fry for another 2 minutes, adjust with salt and pepper and add the sauce. Quickly bring to a boil, lower the heat and add the meat again, warm and serve immediately, garnish with cilantro. Yum!!