Showing posts with label ABC. Show all posts

Monday, June 03, 2013

ABC Cheese and Herbs Yoghurt scones !

BLOG 198

In the month of June (June already!! And we haven’t had one summery day yet!) we’re baking from the King Arthur website and tune in to a recipe for savory scones. The original recipe calls them Bacon Cheddar Chive scones. Sounds good right? ABC Bakers have been baking scones before, sweet orange and vanilla flavoured scones from Abby Dodge's book The Weekend Baker. This time we’re looking at the savory side of things, adding cheese and green herbs instead. (and bacon!! there’s bacon in the original recipe!)

Just to show you that for some things I’ve come a long way; here’s another post,  where I state that I don’t understand “ this “ dough! That was way back in 2006 and I clearly learned a couple of things along the way… scone dough does not scare me anymore. Sometimes you just need to see how it is supposed to be. Here’s another example: for years I’ve declared that I couldn’t roll out dough. Until I actually saw someone “lightly flour the countertop”. Wow. Lightly flouring got a whole different meaning. And I can roll out dough since!

BLOG 197

Cheese and green herbs Yoghurt scones

(adapted from a King Arthur Flour recipe)

Ingredients:


  • 2 cups (8 1/2 ounces)  All-Purpose Flour
  • 3/4 teaspoon salt (Original uses 1 teaspoon which I think was too much)
  • 2 teaspoon baking powder (I think I actually used just 1 and forgot to add the second….but not sure of it though.)
  • 1/2 teaspoon baking soda
  • 2 teaspoons sugar
  • 4 tablespoons (1/2 stick, 2 ounces) cold unsalted butter
  • 1 cup grated Gouda cheese
  • snipped spring onion
  • snipped fresh chives
  • snipped fresh oregano     -----> all herbs combined makes about 1/2 cup
  • snipped fresh flat parsil
  • 1/2 cup skimmed milk + 2 tbs for brushing (which I forgot)
  • 1/4 cup yoghurt

So where is the bacon you ask? Ehm not here, not this time in this recipe. Didn’t have any and decided to let the herbs shine so here we are!

How to:

Preheat the oven to 425°F.

My convection oven was at 200C, and I baked my mini-ones for 20 minutes. Plenty brown and plenty done!

Lightly grease a baking sheet, or line it with parchment.

I used my Magimix to mix the dough.

First I combined flour, salt, baking powder, baking soda and sugar and pulsed to combine.
Then I added the butter in chunks and pulsed some more until the mixture is crumbly.
Transfer to a big bowl and stir in cheese and herbs with a fork until evenly distributed.
Stir together milk and yoghurt and add to the flour. Stir to combine.
Try squeezing the dough together; if it’s crumbly and won’t hang together, or if there are crumbs remaining in the bottom of the bowl, add cream until the dough comes together. Transfer the shaggy dough to a well-floured work surface.

I made mini-scones: Divide the dough in half, and roll each half into a 5" round. Cut each round into 8 wedges. Bake in a preheated 425°F oven till golden brown, 18 to 20 minutes; (or for about 25 minutes if frozen).

BLOG 195For bigger ones:
5) Pat the dough into a smooth 7" disk about ¾" thick. Transfer the disk to the prepared baking sheet.
6) Use a knife or bench knife to cut the disk into 8 wedges, spreading the wedges apart a bit on the pan.
7) Brush the scones with a bit of cream; this will help their crust brown.
8) Bake the scones for 22 to 24 minutes, until they’re golden brown. Remove them from the oven, and cool right on the pan. Serve warm, or at room temperature.
Yield: 8 large scones
Baker's tips
•Want to make scones now, freeze and bake later? Make scones up to the point they're on the baking sheet, cut and ready to bake; don't brush them with cream. Freeze, then remove from the sheet, and wrap airtight in a plastic bag. When you're ready to bake, remove however many you want to bake from the freezer, place on a baking sheet, brush with cream, and bake in a preheated 425°F oven for 35 to 40 minutes, until golden brown.

Anyone that hesitates to make scones can look at the Bakers Banter site recipe where there are additional step by step pictures. Very helpful to see how moist your dough can be.


BLOG 200My notes:

- Absolutely delicious!!  I never missed the bacon! With the herbs and the cheese there’s enough flavor going on. I will try and reduce salt the next time because I found them too salty now. Especially when you are going to use bacon you will want to reduce the added salt I think, so keep that in mind.

- These most certainly are going in the keeper-book. So easy to make and bake. Easy to make different flavors as well.

- I was surprised how very airy, fluffy and light these were! 


If you'd like to join the ABC bakers in their monthly baking adventures, please go to the ABC blog for more information. If you like to check out what the other ABC Bakers thought of these scones, please click here to find out.

Tuesday, March 05, 2013

ABC Bakers; King Arthur’s no knead Cherry Walnut Bread

BLOG 138

that officially is called Chocolate Cherry Pecan Chocolate Bread in which I forgot to add the chocolate and substituted walnuts for pecans! But… you can find the original recipe here on their website! There are in fact two recipes for the same bread, the one on the blog is slightly different from the one on their website, I used the one on the blog. Handy step by step pics; isn’t that easy?

Almost as easy as it was to make this bread, no knead so I feared a gummy inside but no, not at all! I handled the wet and sticky dough as if it were a sweet soda bread and patted the dough in shape. This got me not as much ovensprings as I hoped for and thus a slightly tighter crumb but on the whole we like this very much. A pleasantly firm crust and really nice the next day toasted.


Don't forget to check out the other ABC bakers' No-Knead Bread.

Monday, February 04, 2013

ABC Bakers; a recap of long lost pictures. Boston Cream Pie


Happens to me far too many times lately; make the challenge recipe, make pictures while and after and never write the post to go with it. Or in this case, falling in love with son #1 new camera, take pics and realise I can’t get them off camera because I miss essential parts… This was the case for the Panettone Muffins as well as the Boston Cream Pie. So my well intended plans went out the window right the first two months of the year!

This year we chose to bake from King Arthur; the website. Very happy about that because I do like King Arthur. A lot. Their blog is down to earth, filled with sound advice and do-able recipes. On to this one then. Boston Cream pie, the Pie that isn’t a pie at all. The pie that is cake. A cake filled with pastry cream and topped with a dark chocolate ganache. What’s not to like? I chose to bake the cake in a silicon sunflower pan. Silicon pans have come a long way, the first were not very good IMHO, baking cakes or bread in the early ones made for bleak results. These days they deliver nicely browned crispy edged bread/cakes. I’m a convert!

I followed the recipe on the King Arthur website for the cake, for the filling and ganache I used my own recipe. Initially I made a ganache following their lead but wasn’t satisfied at all. Probably the chocolate chips I used were off somehow, I binned it and started afresh with dark baking chocolate and got the shiny dark result I was looking for.


P2030778

The cake baked and cooled and I used this handy device to slice it in half so I could fill with pastry cream. See how nice it browned and how crisp the edges are? Almost too pretty to obscure the definition with ganache don’t you think?

P2030775 


P2030777

Sliced cake, nice and even, a tight crumb but airy enough to please. On with the filling; I used a basic pastry cream recipe but enhanced the flavor with a bit of orange liquor and orange zest.

In my Daring Bakers time we also made a Boston Cream Pie and I remember that one as a moderately stressful undertaking ;-). I remember loads of eggs, a pastry cream that wouldn’t behave but was ultimately delicious in the end. As in “eat from the pan with a spoon while it’s hot” delicious. This time around I think the cake was better, the pastry cream thickened as it should and my go-to ganache recipe is just what it is: a go-to TNT recipe!


Messy cut slice, the boys too eager to dive in, not waiting long enough for the ganache to harden. They were a bit apprehensive about the filling (what’s that inside Mom, pudding?) but once tasted they declared it good and went ahead… They raved about the ganache (can you tell they’re chocolate lovers?) It was exactly the right consistency to drape the cake with a smooth and rich mouthfeel.
Don't forget to check out the Boston Cream Pie of all the other ABC bakers


P2030780

Monday, December 03, 2012

ABC Bakers; Ginger crackles

Ginger crackles up close
A crackling good cookie! I could have known because Lien’s monsters couldn’t leave these alone… so that means good news for my monsters: cookie time! The dough didn’t look like a lot but I scaled down the size and got 70(!) cookies from it… talk about value for money dough! I smile when I make smaller cookies (or meatballs for that matter) because my boys always want two, or three, or four maybe? Now I can be the best mom ever and grant them another one, and yet another one..
blog 079

These were an instant hit! When I was still mixing up the dough Son #3 –the one with the discerning nose and palate-, asked what spices were in the dough and gambled on ginger and cinnamon. Right! Son #2 was the wild card, you never know what he likes or dislikes. He is a picky eater and I suspect a large part of that is between his ears and has nothing to do with taste buds. So when he came home from school and before taking off his coat said: Owwww what’s smelling so good? I simply told him crackly cookies. Left out the ginger bit because ugh.. ginger? Wait and have him taste and declare it good and only then tell him ginger wouldn’t work either, he would refuse any cookies even though he loved them before. Because you know: ginger! As I said: in the brain, not the tastebuds.
Ginger crackles the batch
This is the last month in which the ABC bakers conclude their year of baking with Abigail Dodge: The Weekend Baker. I certainly had my favourites, there weren’t many disappointments and if there were it was probably more that it wasn’t to our liking than the recipe in itself.

As I said before I love the concept of the book, I think it’s brilliant to look at baking fresh family favorites from the viewpoint of a busy household. In every recipe Abby follows a set of  guidelines. She tells you the do aheads, e.g. prepare through to step X then refrigerate, or prepare through step XX and freeze. Each step is numbered, so it’s easy reading and a quick look up.
Where possible flavor variations are given and the best of all; ingredients are listen in either metric (grams), imperial (ounces), or volume (cups..). This was/is certainly a book I enjoy baking from!

After the boys had their fill I layered some 40 cookies in a single layer between waxed paper and put in the freezer…. I plan to get some of them out by the end of next week to see how they keep. Also I have stored a couple in the fridge in an airtight container. So by the end of next week I’ll be able to decide whether to bake again the week after and refrigerate until the big dinner party or keep the remainder in the freezer. Edit to say: these store beautifully!! In the fridge as well as the freezer. The batch from the freezer (single layers between waxed paper came out like fresh!)

We still have a cookie jar left filled with crackles to enjoy tonight and tomorrow!
You can get the recipe on Abby's website here. And if you like you can hop over to the ABC blog to see how the other ABC bakers did.

Notes on the recipe:
- held back on the ground cloves, added 1/4 tsp instead of 1/2
- no molasses and no golden syrup in the pantry; substituted “keukenstroop”
- smaller cookes, baked shorter time (10 minutes)
- fan assisted oven, decreased temp by 20C to 160C
- rolled in unrefined sugar

All in all a lovely tender cookie, crisp exterior, slightly chewy interior. Re-bake-able! (and you know, I think it would be great to mix it up in ice cream..)
Technorati Tags: ,,,

Friday, November 02, 2012

ABC Bakers… Velvety Pumpkin tart.. in timely fashion (not!)

blog 026 This is just one big oops.
I roasted my own pumpkin (ooh that smell, I love it!) then made my own pumpkin puree, baked the pie… and never posted! So this is going to be a quick one, and to add worse to already bad I am going to antedate the post as well. Hah, try to keep me from it!
Saturday 20 October and we were having guests on Sunday so I set out to make the pumpkin pie (hehe, just to show you it was there, right on time) The pumpkin roasting in the oven made the house smell wonderful and the puree was fixed easily. As always I was surprised how little puree you get from one nice sized pumpkin but it was plenty for the pie. I used “bastogne” cookies for the crust and added a little bit of extra butter to get them at the right consistency. The filling was very easy to make but I was a bit worried about the amount. It looked like it wouldn’t fill the pan properly…. As you can see from the pics I got a very shallow tart but I must say the ratio crust – filling for us was perfect. Not too much gooeyness, not too much crust.  two Dutch cookies called  Bastogne koek  on a white background  Stock Photo - 15006207
I wasn’t exactly smitten with this pie although our guests –and my family- really liked it. For me the cream cheese was a bit too much in it, very rich and the tang you get from it together with the richness is just not for me. The recipe comes from The Weekend Baker by Abby Dodge. Check out the other at the Avid Bakers Challenge

blog 028

Tuesday, October 02, 2012

ABC Honey Spelt Oatmeal bread


Honey Spelt Oatmeal

A nice change from the other recipes the ABC bakers made so far; this month we’re baking a Honey Oatmeal bread from The Weekend Baker byAbby Dodge. Or… that’s what the recipe said. For once I was determined to do as the recipe told me and not stray from it. Just read and go with it. And I did.

Except for substituting half of the white bread flour for spelt. Which I thought was genius. A nice hearty flavour to add to the oatmeal and honey goodness. If only my genius-ness (is that a word? Probably not) would have stayed with me for a tad longer. Than I would have overruled the recipe by reducing the salt and the yeast and the liquid….

We’re in Holland, our flour is less strong than yours, that’s why Dutch bakers usually grab the –somewhat- stronger bread flour instead of AP and in the same instance reducing the liquid. I know I thought the amount of salt used was quite a lot for the amount of flour, same for the yeast. I could reason some of the excess yeast by the amount of butter and honey. A sweeter dough takes longer to rise and probably the higher amount of yeast would take care of that, a bit of a short cut really.

Spelt flour can be quite moody in taking water so if I had been thinking while mixing, I would have changed all of the above. But no, I steadfastly kept to my vow of following the recipe. And got a very very wet dough, incredibly tacky (thank you spelt!). Mixed it up –kneading wasn’t really the word for it- and covered it for a night’s stay in the fridge.

The next day the dough was somewhat firmer, more or less shaped it in a bread pan (no way this was going to hold up in freestanding baking) and baked with steam. The resulting bread was quite poofy and airy (yeah right what else did I expect) but looked surprisingly good I must say. We had a slice yesterday night and the Husband commented that it was salty. Good but salty. Real salty. The message is clear honey, I know!

Still, when I took it out of the paper bag this morning *someone* had been cutting it into neat slices and took it with him for lunch! So.. all in all not bad but I know I have to trust my instincts next time.


Don't forget to check out the other ABC bakers.


Technorati Tags: ,,

Monday, June 11, 2012

ABC Baker’s; Mushrooming Brioche

ABC Brioche slice ABC Brioche interior
ABC baking time. Baked in time, posted late. Abby Dodge’s book "The Weekend Baker" Page 339 gives us Overnight Brioche (braid).
A wonderfully soft and airy sweet bread, I flavored ours with orange peel and almond which made it very fragrant, almost cake like in eating. Very good but difficult to use as sandwich bread. Lovely toasted though with a smear of butter.
I sampled two slices and the rest of the loaf went home with the man who clipped our hedges. Nothing says thank you better than fresh bread right?
In all hectic of that particular day I forgot to eggwash the top of the bread and didn’t find the patience in me to wrestle the very soft and very sticky dough into a braid. I just rolled it up as good as I could and plunked it in a loaf pan…. A too small loaf pan perhaps? This baby rose and rose to higher places. Ballooned all over the rim of the pan.

If you would like to join ABC or just check out the other posts of my fellow ABC bakers, head on over to the ABC blog!


ABC brioche mushroom
Blog Signature

Tuesday, May 01, 2012

Small big batch of scones in ABC Bakers


Because I really wanted to try this recipe before I committed to making a big batch of scones... This ABC edition is about making scones. Remember we bake from Abby Dodge's book The Weekend Baker? So far I've made some pretty good recipes, had one or two bummers and this was again a hit. It's too bad I can't let you bite into them, they're wonderfully flaky and very very tasty. Kids "complained" they were almost cake like! Complained because I said they could try a little butter and blue berry jam on them but they also like them plain and I only made 6 so what were they supposed to do? Now they had to choose which bite would go with jam and which to have plain LOL.


I completely forgot to add the chocolate chips I had already laid out, so the flavour of these were "just" orange zest and vanilla... lovely! Maybe it's a good idea to follow Abby's big batch suggestions so there's always a container with already mixed dry ingredients on hand, these are ready to bake in 10 minutes. Oh and I used my food processer to cut the butter in the flour. I do have this dandy little gadget but I love my Magimix to do the work for me. Just have a light hand with pushing the button (rather use the "pulse" button than the continuous one to not overmix).


Enjoy mine and have a look at my fellow ABC Bakers, here they are:  ABC bakers.


Wednesday, April 04, 2012

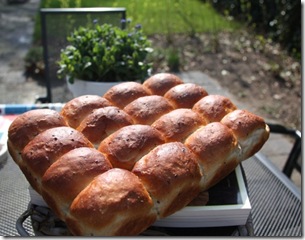
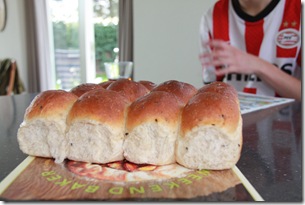
ABC Bakers: Pull apart buttery rolls

IMG_4323

ABC Badge_Post ABC Bakers post for April is about bread, fluffy white dinner rolls. Or in our case lunch rolls for hungry teenagers that came in after a morning of playing soccer. They each had four….
The idea to make a series of rolls so close together that they become one is fun. The fact that they bake in a pan instead of a sheet make them go up instead of sideways.

IMG_4328

I’m afraid I left the recipe and went with the idea of pull apart rolls, baked in a 9x13 pan. I really thought we didn’t need all that sugar and extra butter in rolls. What I did was adding some cooked couscous! I had some leftover from dinner and while mixing the dough thought that would be a nice addition…. Furthermore I subbed some rye for white flour and added black sesame seeds in the dough, and used all milk.IMG_4326

Those rolls were more filling than you would guess, although they rose quite high and their crumb was nice and airy. Brushed the domes with butter while hot. I love the shine and the resulting crust you get by doing that.

This is what I went with:

Pull apart rolls;

270 ml milk
40 gr butter
170 gr rye
300 gr bread flour
1 egg
2 tsp yeast
2 Tbs sugar
1.1/4 tsp salt
40 gr cooked cous cous
black sesame seeds (approx. 2 Tbs)

Knead a supple dough, first rise is fairly quick because of the amount of yeast in these, about 45 minutes. Turn dough out on a clean work surface (no need for any extra flour, if you don’t feel safe use a bit of oil on your counter). Deflate by pressing down gently and roll up tight. Then proceed by dividing the dough into 16 equal pieces. I like to use my bench scraper to do that.
Roll into balls by cupping your hand over the dough ball and lightly push the ball against the counter while making small rotating movements. This way you make use of the friction from the dough against the counter to make nice and tight rolls. Try it! You’ll be amazed how smooth and quick this goes. (If think this is hard try practicing with an orange).

Put the balls of dough in your buttered pan (9x13”)  cover with plastic wrap and let rise for the second time until they are nice and close together. This will probably take another 40 minutes.
Bake in a preheated oven (375F or 190C) for about 20 minutes, until nice and golden. When finished brush the tops right away with some butter. There’s no need to melt the butter because the rolls are still hot.

Enjoy!

Tuesday, March 13, 2012

ABC Bakers: Blender Emergency cupcakes

ABC Badge_Post

This is worrying! I am not even close to the deadline, or maybe I’m just early for the next? Yes, let’s keep it at that.
It is just that life is happening and sometimes life is happening quite forcefully. Oh well.

One could wish cupcakes could cure each and every bump in the road, even the biggest ones. Alas I don’t think they do and … I’m afraid these wouldn’t come even close!IMG_3556

Not sure what’s wrong with them because I read my fellow ABC bakers’ stories and they were happy. Well the choco-monster boys in my house will eat anything chocolate and they did initially. The next day four cupcakes were still standing and wouldn’t be touched. A sure sign. Above and below are pictures of the very first batch, used a minty buttercream frosting with a tiny chocolate flavoured buttercream tip on top.

IMG_3559 {mad piping skills!}

Made this recipe three times. First time I used Dutched cocoa, using a whisk and a bowl, long time ago so I can’t remember precisely what I did, I do remember we weren’t fond of it but I credited that to the hurry in which I made them at the time. Second batch I tried adding a little lemon juice to make up for the Dutch processed cocoa. Third batch was made using baking powder instead of baking soda to make up for the Dutch processed cocoa and dutifully used the blender as per the recipe.IMG_4079

We all missed creaminess, soft crumb and depth of flavour, instead  we found dense, tight crumbed and moist? almost wet cake. I admit that I probably underbaked the last batch hence the lava center. IMG_4082

Not one to repeat for us. Up to the next!

Thursday, February 02, 2012

ABC Bakers: Glazed Cinnamon Rolls

Another edition from the  "The Weekend Baker" by Abby Dodge. This time we bake cinnamon rolls. Always a favourite in this house, I was curious to see if this recipe could win the boys' approval.
No need worrying, it did!
This time I followed instructions to roll from the short side. Somehow that always strikes me as odd. Not sure why maybe it's because when I roll the dough the long side is towards me and it is just so easy to start and roll up and away from the counters edge.


This got me worried! See how dark the rolls got after the stated oventime? I must say I wasn't paying attention, just set the timer and went on with other things, only alerted by the beep.... Dark gold brown, oops! Feared these were overcooked and -thus- dry. Luckily they weren't dry at all. Next time I will watch them more closely.


Prior to ferment, silky soft dough, highly elastic: just right!


Punch down, roll out and fill with a mixture of brown sugar, cinnamon and butter. Roll up (from the short side!) and score to cut by using floss thread. Easy peasy and into the pan they went.
Lovely recipe, sure to make again.

This recipe as well as the other recipes in this book are divided in do-able steps over the course of one, two or even more days; refrigerating or freezing inbetween. So easy!
My fellow ABC-bakers have posted links to their recipes here, have a look!


Sunday, January 08, 2012

Yes, We Have No Bananas. {An ABC chocolate swirl cake}

This is my second year of ABC-baking where we choose to bake a recipe each month from one book. In 2012 you’ll see us baking through: The Weekend Baker by Abby Dodge.

(I ordered my copy here btw, excellent customer service, great prices, no shipping costs! I’m just saying…)

First let me get into a little introduction about the book, don’t let the title fool you into believing you’ll be getting recipes here that can only be baked when you have two days with nothing to do on your hands…

No! This is a book that is written with busy people in mind. The author breaks down the recipes into doable stages, instructing you when and how to prepare and how long each step will take you. This way she enables you to bake lovely recipes by preparing ahead and setting things aside until you’re ready for them the next day. Recipes are listed in the order of the time they take, so if you will you can have cookies in 30 minutes, or a cake in an hour. When you’re in for something more elaborate there’s always the chapter: “productions” (equally broken down in easy steps).


Hanâa contacted Abby and she was excited to pick our first recipe herself: Nut-Crusted Chocolate-Banana Swirl Cake! Sounds good no? That’s what I thought. I also thought that anything banana except fresh doesn’t go down well in my family. The book has been on my writing table for a week and I couldn’t decide what to do. Bake anyway using bananas, risking that no one will eat it? Bake and leave them out? What will that do to the recipe?

Today I decided I had procrastinated long enough. That cake needs to be baked. And when I opened the fridge the answer came from a small bowl of leftover homemade apple sauce whispering: Use me! Usually we never post recipes from the book we’re using as to encourage readers to buy the book but I tinkered around a bit so I think I’m allowed ;-):

Not crusted, no banana, cocoa swirl apple cake
{adapted from The Weekend Baker by Abigail Johnson Dodge}

12-cup Bundt/fluted pan, buttered/spray
oven preheated 180C/350F

the batter:
- 255 grams ap flour
- 2 tsp baking powder
- 1/4 heaped tsp baking soda
- scant 1/4 tsp table salt
- 160 gr unsalted butter, room temp soft
- 220 gr granulated sugar
- 200 gr. home made smooth apple sauce, room temp
- 1 tsp vanilla extract
- 1 tsp dark rum
- 3 eggs
- 6 tbs créme fraiche, stir to loosen up a bit
- 2 heaped tbs cocoa, sifted

 hand full roughly chopped walnuts

Prepare the pan, use butter or spray. Drop chopped nuts on the bottom of your pan, dividing them between the rims.

In a medium bowl, combine flour, baking powder, baking soda, salt and whisk until well blended. In a large bowl, combine butter, sugar, apple sauce, vanilla and rum. Beat with a handheld mixer (or use the paddle attachment on your stand mixer) until well blended.

Although all my ingredients were at room temp. it still looked a bit curdled but no need to worry!
Add eggs one at a time, beating after each addition just until blended, stopping to scrape dwon the sides of the bowl as needed. Next add half the flour mix and stir gently with a rubber spatula until just blended. Add créme fraiche and blend, then add the remainder of the flour again until just blended.

Divide batter in two equal parts; one is left white, the other part gets the cocoa stirred in until nicely combined. With a spoon, add a scoopful of each batter around the pan until all the batter is used. I didn’t swirl with a knife afterwards because I spooned both batters alternately but you could if you wish.

Bake for 45 minutes, check with a toothpick or cake tester inserted near the center comes out clean. Transfer the pan to a rack to cool for 10-15 minutes, no longer.
Abby warns us that the cake will stick if you leave it longer than that. Unmold too early and it will break into chunks. Sounds scary huh?

I was a bit worried about unmolding because I heard one or two rumours about sticking/chunks… Holding my breath but the cake slid out just as it should. While I’m typing this up there are munching sounds from the livingroom. Or rather there’s silence (I wouldn’t want you to think I didn’t raise my family to eat properly…) The husband is sneaking up towards the counter and asks for seconds already holding the knife…. He is allowed only if he leaves enough of the cake to photograph tomorrow! Mission accomplished, really really good cake!

I like it, although it's quite dense it is not dry at all. Love the fact that you can easily distinguish the two flavours, my Dutch processed chocolate made for a very chocolatey taste, and in the white parts you can track down the rum and vanilla. Nice!