Saturday, February 27, 2010

1000 layers.. Spekkoek / Lapis Legit


(For English please scroll!)
Dit is een cake (of koek) die tot de verbeelding spreekt, één van de jongens was altijd al gefascineerd als hij spekkoek in de winkel zag, (waarom zijn die dingen altijd in kleine stukjes verpakt? Ik heb nooit een hele gezien) Mam, mam kunnen we die een keer kopen? Ik vond er zelf eigenlijk niet veel aan. Zelf bakken heb ik eigenlijk nooit durven doen; lastig dacht ik. Valt eigenlijk best mee. Dit is een recept dat ik via Lien heb gekregen, ik heb zelf ergens een versie met 18 eieren, en op internet zag ik recepten met wel tot 30 eieren....

Recipe Lapis Legit
(De complete Indonesische keuken" - Lonny Gerungan)
7 eieren (gescheiden)
250 g zachte boter
200 g gele (of witte) basterd suiker
100 g patent bloem
1/4 tl zout
1 tl vanille-extract (of het schraapsel van een vanille stokje)
ong. 50 g gesmolten boter (om de lagen tussentijds te bestrijken)

Optioneel:
- Voor een extra kleurtje: verdeel het beslag in twee (of drie) gelijke delen, laat 1 deel zoals het is, kleur een deel met 1 el cacao-poeder en het derde met groene voedingsmiddelen-
kleurstof.

- Gekruid: verdeel het beslag in 2 delen, laat 1 deel ongemoeid en kruid het 2e deel met speculaaskruiden. Mijn bijna 100 jaar oude kookboek noemt: kaneel, kardamom, nootmuskaat, kruidnagel en piment als gebruikte kruiden.

Oven op grill stand
Ingevette springvorm van ca. 20 cm

Boter met suiker zacht en romig kloppen. Eén voor een de eidooiers toevoegen en kloppen totdat de dooier geheel is opgenomen. De bloem samen met het zout boven het botermengsel zeven, vanille schraapsel (of extract) toevoegen en met een spatel omscheppen.

Met een mixer de eiwitten in een brandschone kom tot stijve pieken kloppen. (Voor alle zekerheid kom en mixerhaken even afnemen met een keukenpapiertje met citroensap).
Dan 2-4 el van de eiwitten stevig door het botermengsel roeren en vervolgens de rest van de eiwitten voorzichtig door de boter-ei massa spatelen. Al met al blijft dit een redelijk stevig beslag.

Het rooster van de oven ong. 10 cm onder de grill plaatsen, een paar eetlepels beslag in de vorm scheppen en uitsmeren tot een egale laag. Zet de vorm onder de grill totdat het cakelaagje mooi bruin en iets gerezen is. Duurt maar enkele minuten, blijf erbij en kijk ernaar!!
Vervolgens de vorm uitnemen, de bovenkant van het laagje met gesmolten boter bestrijken en weer een laagje beslag in de vorm strijken. Herhaal dit tot al het beslag op is, dus bakken, boter, laagje.

Laat de cake nadat het laatste laagje gebakken is in de vorm afkoelen en serveer in dunne plakjes.

Het schijnt zo te zijn dat de koek na een dag of twee nog veél lekkerder is. Ik hoop dat we dat kunnen meemaken hier, iedereen vond hem érg lekker! In plastic verpakt ook uitstekend in te vriezen.
This is a challenge I've tried to escape for a long time although it always fascinated one of my kids: Mom. mom look, can we buy a piece? Got this recipe through Lien and you know what? It's less daunting than it appears to be. My family loved it, it's quite rich and dense so a thin slice is enough but it's flavour is very nice and delicate. Lovely!


Recipe Lapis Legit / Spekkoek

7 eggs (divided: yolks and whites)
250 g unsalted butter, softened
200 g light brown (or white) soft sugar
100 g ap flour
1/4 tsp salt
seeds from one vanilla pod
50 g unsalted butter (for brushing)

Preheat the oven to 175°C/350°F
8" buttered springform

Optional
* spiced version: mix one part of the batter with 1 tbs of our Dutch "speculaas spice" which consists of mix of:

8 ts ground cinnamon
2 ts ground nutmeg
2 ts ground cloves
1 ts ground white pepper
1 ts ground ginger
1 ts ground cardamom or anise

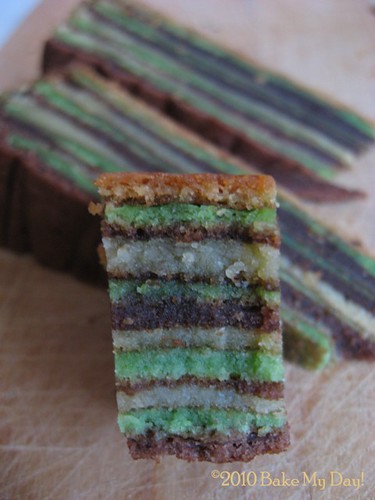
* colored version, 1 part plain, 1 part mixed with 1 tbs cocao powder, 1 part mixed with green food coloring.

The definition in the layers will also take place with plain batter; because the top of each layer is golden brown you'll see thin stripes in the final cake.

Directions:
Cream butter and sugar until light and creamy. Add yolks one at a time, stir vigorously after each addition. Sift flour and salt over the mixture, add vanilla seeds or vanilla extract and mix.

Whisk the egg whites to stiff peaks, stir two TB of the eggwhites into the batter and use a spatula to fold in the rest. For extra color or a spiced version, this is the time to divide your batter. Precede as follows, alternating the batters creating a multi-layered cake.

Heat the grill, place a roster about 10 cm/4" under the grill.
Form the first layer by scooping2-3 tbs in the form and spread in a thin layer. Bake under the grill for a few minutes until the top is golden brown. Keep a close watch! Take out and brush the layer with melted butter. Make the second layer, bake, brush and keep repeating the process untill all batter is used.

Let the cake cool in the mold. It's quite a rich and dense cake, serve in small slices. The cake will freeze perfectly wrapped in layers of plastic, but...the Lapis legit tastes even better after "resting" for a day or two.

Thursday, February 25, 2010

Round up Bread Baking Buddies: Ensaïmada


The Bread Baking Babes have been baking delicate small rolls called Ensaïmadas in our February Kitchen, and as always we've invited you to bake along with us and become a Bread Baking Buddy! This is the round-up of Buddies that have been baking Ensaïmadas, enjoy!

Nicole (Delicious Days) thank you for letting us use your recipe!


The first to show how she rolled was Andrea over at the blog Family and Food, look at those lovely layers:
And then there's Soepkipje who's pictures can be found on her fotoblog she used all olive oil and made different fillings, would love to try her bavarian cream ones!

Next up is Anne Marie at Rosemary & Garlic, she followed the link to the videos and discovered the Spanish language isn't hard at all especially when chocolate is mentioned!

I know for sure there's one canine happy to be in the kitchen, Elle from Bread Baker's Dog has baked with us and made these beauties:
Nicole, Bread, butter and buns, was transported back to her teens when she baked Ensaimadas, she actually lived in Mallorca once...sweet memories indeed!
Andreas who is travelling with us to catch some -much needed- early sun at Delta's kitchen:
Kelly shares her Ensaímadas in her Messy Kitchen, breaking a lance for pork fat and butter; the good stuff (her words ;)All the way from Italy another Buddy; Cinzia at Cindystar surprised her kids with these ultra-light buns for breakfast!
Stay tuned for the next episode of Bread Baking Babes around this time next month on a blog near you, another one of my fellow Babes has already dreamed up a new and exciting recipe and we're getting out our gear and flourdusting our work surfaces...

Wednesday, February 24, 2010

Knibbel knabbel knuisje....


wie komt er aan mijn huisje?
Een meneer met een hele grote graafmasjien misschien?

Zoals je misschien al doorhebt zijn wij in het bezit van een huis (nou ja, beetje van mezelf beetje van Maggi de bank). Dat huis is een huis zoals een kind het zou tekenen, driehoek dak, deur in het midden en twee ramen aan elke kant. Het huis is aardig op leeftijd. Daarbij hoort een evenzeer op leeftijd zijnde schuur. Van hout. In zijn hoogtijdagen wellicht garage geheten, 60 jaar na dato viel hij bijna zelf om van treurigheid.
Before...
After...

En als we dan toch... moeten we dan niet ook? Ja toch maar doen. Dág speelhuis, kasteel, fort, verstopplek, uithuilplek, buut, goal.

Wat wil je ook; een glijbaan, picknick plek, huisjes, heuse loopbrug, schommels en klimtouw... compact attractiepark voor ieder kind zomaar in de tuin. Zucht. Dat deed me meer dan ik had gedacht. Weer een tijdperk over.
Leeg! Erg leeg.

Saturday, February 20, 2010

On a donut high.. donuts uit de oven

Het succes van de gefrituurde donuts / doughnuts? met Oud en Nieuw deed verlangen naar meer! Maar om nu weer een middag in zo'n wolk van olie te staan en vooral het schoonmaken vóór het bakken (vet eruit, verse olie erin) én erna (muren van de bijkeuken, olie eruit en vet erin) wetende dat al die arbeid niet voldoende zal zijn om de geneugten van de donuts van je heupen af te krijgen.... Nee ik was bang dat het niet meer dan eens per jaar zou gebeuren.

Helaas (of gelukkig?) had ik lang geleden een recept van Tartelette bewaard waarin donuts worden gebakken. In de oven. Uiteraard -zegt ze- niet te vergelijken met heuse gefrituurde maar toch erg lekker. Dat moest worden geprobeerd.

En weet je? Het wérkt gewoon. Ze zijn heel erg lekker! Toegegeven ze zullen geen plek veroveren op de schijf van vijf maar niettemin minder vet (joepie) en minder werk dan de frituur. Goed genoeg toch?

Gebakken donuts:
(afgeleid van het recept van Tartelette)
Afhankelijk van de grootte natuurlijk; ong. 20-25 donuts

300 ml lauwwarme melk
2.1/4 tl droge gist
2 el boter
150 gr suiker
2 eieren
600-700 gr patent bloem (5 cups)
twee snufjes verse nootmuskaat (liefst vers geraspt) niet weglaten!
1 tl zout
~~~~
Om te dippen en rollen:
Gesmolten boter, suiker en kaneel of een glazuurtje van poedersuiker en citroensap

Alle ingredienten (begin met 500 gram bloem en voeg meer bloem toe indien nodig) in een grote kom samenvoegen en in 5-8 minuten kneden tot een soepel deeg. Het uiteindelijke deeg moet heel soepel en zacht aanvoelen zonder te plakken en loslaten van de kom.

Breng over op een licht bebloemd aanrecht en kneed met de hand nog even door. Dan tot een bal vormen en in een ge-oliede kom afgedekt laten rijzen tot ongeveer verdubbeld.
Voorzichtig uit de kom laten glijden en op een licht bebloemd aanrecht uitrollen tot een plak van ongeveer 1 cm dik. Officieel hebben donuts natuurlijk een gat in het midden, hiervoor steek je eerst rondjes uit (van ong. 4-6 cm). Gebruik hiervoor een ronde koekjesuitsteker die je in de bloem duwt. Dan overhevelen op je ingevette of met bakpapier bedekte bakblik en daarna pas het gat in het midden uitsteken met een kleiner maatje.**
Als je namelijk gelijk al het gat uitsteekt krijg je je donut nooit netjes rond op de bakplaat, vandaar. Afdekken met een theedoek (of een stuk plastic) en laten rijzen, nu ong. 45 minuten.

Afbakken: 8-10 minuten in een voorverhitte oven (190 C of 175 voor een heteluchtoven). Kijk voor een goudbruin onderkantje. Bakplaat uit de oven en eventjes laten koelen totdat je ze vast kunt pakken. Dan dippen in gesmolten boter en door kaneelsuiker rollen. (Of dippen in glazuur, jam, hagelslag, sprinkles.... de mogelijkheden zijn natuurlijk eindeloos maar ik moet zeggen; zo warm uit de oven met kaneelsuiker...Jammie!! De volgende dag vonden de kinderen ze nog steeds heerlijk maar echt het allerlekkerst zijn ze vers uit de oven.

Om ze toch, bijv op een zondagochtend, vers te serveren kun je het deeg ook van tevoren maken en de tweede rijs afgedekt in de koelkast laten gebeuren. Ik heb dit nog niet uitgeprobeerd, mijn koelkast is veel te klein om zoiets te kunnen doen helaas. Dan haal je ze een uur tevoren uit de koelkast om op te warmen alvorens je ze in de oven gooit. Zorg wel dat je de ongebakken donuts zowel in de koelkast als tijdens het op temperatuur komen goed afgedekt hebt.

En.. en... en... dan heb je natuurlijk die gaten over.... gewoon bakken! Die zijn namelijk het allerlekkerst! Bite-size, warm en geurig. Misschien ga ik dat de volgende keer wel doen, alleen maar donut holes maken. Mini mini. Kijk maar hoe schattig.

Thursday, February 18, 2010

Bread Baking Babes bake Ensaïmadas!


It's my turn again! Can you believe we are heating up our ovens for the third year being Babes?

The sweet little bun we're going to make this month is called Ensaïmada and it's said that the origin dates back to the 17th century. Ensaïmadas are made in a lot of Spanish speaking countries, Spain obviously but also the Philipines and Puerto Rico. An inconspicious looking pastry-like bun which will reveal it's little secret once torn (or bitten into). Why this choice? Purely coincidence. At the time I was reading a book called "The Shadow of the Wind" by Carlos Ruiz Zafón. The main character is the son of a bookshop owner he is introduced - as a kind of "coming of age" ritual- to the Cemetery of Forgotten Books (the description of that place makes you want to go there, a mammoth labyrinth with intertwining lanes and aisles and aisles of books....) where old forgotten books are kept to save them. As part of the ritual he has to choose and save a book and make it a part of his life. Well, he does make it part of his life. And how!
""I was raised among books making invisible friends in pages that seemed cast from dust and whose smell I carry on my hands to this day.""
Somewhere in this book the boy is treated to Ensaïmadas. Mental note to self: look up what they are. Several days later I was browsing my reader and what came up? A recipe for Ensaïmadas! So that concluded it. This was going to be the February challenge.
The blog I was reading is called Delicious Days and in the best of blogging traditions Nicole got her inspiration and the recipe from another source, someone named Eliza. (The last link is in German). I asked and got Nicoles permission to copy her recipe -with her remarks and all- here, you'll find my notes below:

Ensaimadas

Recipe source: inspired by Eliza's recipe

Active time: about 45 minutes, rising: several hours, baking: about 15 minutes

.

Ingredients (yields about 10 Ensaimadas):

500g all-purpose flour (plus additional as needed )

75g sugar

1/2 tsp fine sea salt

40g fresh yeast (= 1 cube)

200-250ml lukewarm milk

2 eggs (M)

2 tbsp olive oil

150g soft pork lard

powdered sugar for dusting


Add the flour together with sugar and salt into a large bowl (I used my KitchenAid bowl) and mix well. Make a hollow in the center, add the crumbled yeast as well as a decent pinch of sugar and pour over just enough of the lukewarm milk until the yeast is covered. Stir the yeast milk once or twice, then cover the bowl with a kitchen towel and let rest for about 15 minutes or until the surface of the yeast milk looks bubbly.

Add the other ingredients (the remaining milk, eggs,olive oil ) and knead well, either by hand or with your kitchen machine until the dough comes together nicely. I used less milk in the beginning (200 or 220 ml, while the original recipe suggests 250 ml) and my dough still turned out pretty sticky, I therefor added a tad more flour and let it knead at medium speed for 3 minutes (just for the record: my dough still felt sticky). Let the covered bowl rest again in a warm place for at least 30 minutes or until the dough has doubled.

Punch it down softly, then flip the dough onto a well-floured surface and sprinkle with flour. Cut into about 10 equally sized portions and form into neat little balls, before letting them rest – sprinkled with flour, covered with a kitchen towel – once more for at least 30 minutes.

Shaping the Ensaimadas: Flatten one doughball, then roll out with a rolling pin (use flour as needed) until you get a pretty thin dough circle and brush it generously with the softened pork lard. Roll up cautiously, then let rest for a couple of minutes and continue with the other dough balls. (Meanwhile line the baking sheets with either parchment paper or silicone mats.)
Coil up each dough piece until it resembles the house of a snail (tuck the outer end under), ideally very loosely, because any spaces will fill up as the dough rises further. Place about five Ensaimadas on one baking sheet, making sure to leave enough space between them. Lightly brush with lard and cover up again.

The final rise is supposed to last overnight, yet I baked mine in three different batches (with rising times of 1 hour, 4 hours, 13 hours) and we preferred their look and taste with shorther rising times (1 and 4 hours). But do as you like.

Preheat the oven to 200°C (~390° Fahrenheit) and bake for 14 to 16 minutes or until golden brown. Take out and let them cool down on a wire rack for a couple of minutes, then generously dust with powdered sugar and enjoy while still warm.


My notes:

- like Nicole I did hold back on the milk, using just the 200 ml and got a nice soft dough, not sticky just a bit tacky. I think that I might have gotten away with using slightly more milk because I would have liked to roll them even thinner. I let mine proof for an hour/hour and a half with great results. The amount of yeast used is quite a lot for the flour so they'll rise nicely anyway.

- I used cinnamon/sugar butter in some of the rolls, goose fat in others. Couldn't resist to make a larger one filled with red grapefruit curd.

- They are real fluffy and light, think of the croissant-family with soft layers instead of the crisp flakiness that a croissant has. Love that layering inside. My kids inhaled them!

To guide you on your way to lovely buns with fluttering innards some youtube rolling.
Again, blogroll on the right hand side to go and visit my Bread Baking Babes, see how they rolled!

If/When you would like to become a Bread Baking Buddy and earn your own Buddy Badge to show in your post please bake along with us and make this bread and post before or on Thursday 25th February. Send me your name and the name of your blog with a link to the post (bakemyday AT gmail DOT com) and I'll send you the Buddy Badge asap and show a round up here on Thursday 25! You can read all about being a Buddy in this post.