
 Dear readers, from this Kitchen of the Month we interrupt our regular programming to bring you this important announcement:
the Bread Baking Babes haven't been baking this month.
You read that right, we're not baking we're steaming! (Obvious huh, we're Babes!) So what's keeping you, get out that steam pan, upend the plant to get to its bamboo container, relieve your son from his make-shift helmet (aka your colander) and steam along. You want a recipe with that?
This is from a book I really think interesting, Global Baker by Dean Brettschneider and there are more than a couple of things in there on my to-bake-wishlist. This recipe is one of them.
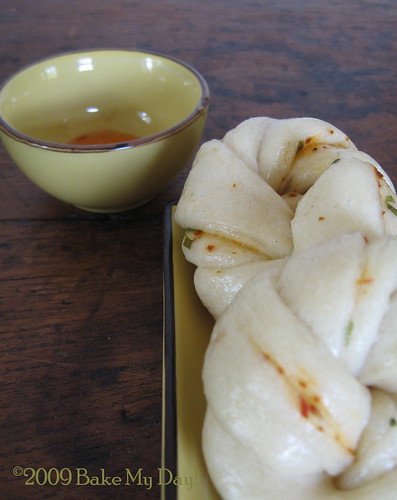
Xiang Cong Hya Juan Bao

(Chinese flower steam buns)
makes 10 buns
"Everywhere you go in China you see people eating steam buns, also known as mantong Typically Chinese, a sweet bread is combined with a savoury filling, such as red bean paste and barbecued pork, but take care and avoid using too much filling or the bun will fall apart during the rising and steaming stage. The baking powder helps to open up the texture and gives a little tenderness to the eating quality of the buns. If you can, use imported Chinese flour from a specialist Asian food market or store".
Dough
300 g chinese flour (use low gluten flour such as cake flour)
15 g sugar
15 g butter
good pinch of salt
1/4 tsp baking powder
1/4 tsp active dry yeast
150 ml chilled water, placed in the refrigerator overnight
Filling
rice bran oil, for brushing on dough
40 g finely chopped spring onions or chives
25 g finely chopped red chillies
salt to taste
To make the dough, place all the ingredienst into a large mixing bowl and, using your hands, ocmbine to form a very, very firm dough mass. Dont'be tempted to add any water or the steam buns will be flat after steaming.
Place the dough on a work surface and, using your rolling pin, roll out to a thin strip, fold this in half and roll again. Repeat this 10-15 times with a 30 second rest in between each time. This is a way of mixing a very firm dough, the dough will start to become smooth and elastic as a result of the rolling process.
Put the dough in a lightly oiled bowl and cover with plastic wrap. Leave in a warmish place (23-25C) for 15 minutes. Tip the dough onto a lightly floured surface. Using a rolling pin, roll out each piece to a 25cm square. {{this is strange...he never states that you divide the dough in this stage, so use and roll the one ball of dough you have}}
Brush the dough surface lightly with oil and sprinkle the chopped chives and chillies evenly over the dough. Season with salt.
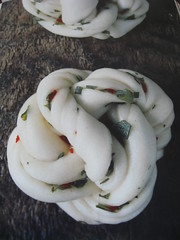
Fold the dough in half and then cut into 2.5cm strips so that you end up with 10 folded strips. Stretch each strip and, starting at the folding edge, twist the two pieces of each strip over each other to form a rope.
Take the twisted rope and tie into a double knot, tucking the loose ends underneath. Place each bun with ends facing down on a 5cm square of non-stick baking paper** and cover loosely with plastic wrap. Prove for approximately 30-45 minutes in a warm place.
Bring a wok or saucepan of water to the boil with a bamboo steamer sitting on top. Remove the bamboo steamer lid and place the buns on the paper in the steamer 3-4 cm apart to allow for expansion during steaming. Replace the steamer lid and steam for 20 minutes. Repeat until all the buns have been steamed and are firm to the touch.
Note: you might want to adjust the steaming time from 10-20 minutes, keeping the water at a low blub.
I made this 3 times, here are my notes on the recipe:
- the paper: the pics in the book show him using paper circles, sort of perforated. (as in: paper circles with rather large holes in them). I'm using a regular steam pan with a metal insert and I preferred oiling the base of the metal insert not using any paper, re-oiling when needed. Another thing: I used a teatowel between the lid and the pan to catch any condensation.
- On flour: couldn't find chinese flour.
First batch: I used our Dutch regular bread flour and didn't add any water (obedient as I am ;)). Really really firm dough, fighting me every inch of the way. Nicely defined buns, good to look at but quite tough/chewy.
Second batch: I used ap flour and added a little more water about 3 tbs. Better to work the dough, more compliant. Better texture, still good definition.
Third batch: I went all out here, leaving the recipe.... used half cake flour/half low gluten flour plus 6 grams of maizena (corn starch), upped the baking powder to 1 teaspoon, upped the yeast also to 1 teaspoon, added far more water to a resulting dough with the feel of pizza dough...
Definition was all over the place, the ropey twists hardly recognizable: they puffed hugely during steam stage. Not as nice to look at but very good to eat; this last batch resulted in soft pillowy buns with a shiny outside. These took not as long to steam: 10 minutes.
My fillings were spring onions and chillies, spring onions and chili sauce, wasabi paste with bits of ginger (Yum!), and to please one of the boys I did two with cinnamon and sugar haha.
I loved the spring onions and chili sauce ones and the wasabi buns were so good! We dipped in soy/chili sauce.
Different filling:
Sweet red bean paste
110 g dried red beans
water for soaking and boiling the beans
120 g sugar
5 tbs vegetable oil
Wash the beans, discarding any that are damaged. Place beans in a small saucepan, cover with water and soak overnight. The next day bring the beans and the water to the boil. Simmer for 1.1/2 - 2 hours, until the beans have softened, adding more water as necessary. Remove from the heat and drain.
Put the beans into a blender or food processor and blend until smooth, adding the sugar and blending again. Heat the oil in a frying pan, add the bean paste and fry on a medium -to-low heat for a few minutes until the paste begins to dry, pressing with the back of a wooden spoon to form a cohesive paste. This will take a few minutes and you will be able to see the oil mixed wvenly through the bean paste. Cool before use. This paste will keep in an airtight container in the refrigerator for up to one week.
Although this is a lengthy story, the "making of" is not very involved, the dough is pretty much straight forward, no long proofing times, you'll have buns on your table in under 2 hours? So what's keeping you? Be a Buddy, earn a Badge and come and bake steam with us, all of us on the right of the side bar would love to see what you make!
The Buddy date is set for Monday 5 October, please leave me your link through email (bakemyday AT gmail DOT com) or in the comments, I'll be happy to visit and send you your Badge!
Trying to add more pics later today!
I really enjoyed baking, no sorry, steaming, this bread Karen, different but not difficult and I think I will make it again but do as you did when we made it! Thanks for widening my horizons!
ReplyDeleteSPANNEND!! Weer iets wat ik nooit eerder gemaakt heb. :-)) Bedankt!!
ReplyDeleteGreat recipe ! I can't wait to start !
ReplyDeleteThanks so much for such a new and interesting bread to make! I had lots of fun and look forward to trying it again soon.
ReplyDeleteZe zien er perfect uit, erg leuk om eens op een heel andere manier broodjes te maken! Bedankt
ReplyDeleteIt looks really fantastic, I'm so sorry I couldn't make it this month. But nothing will stop from drooling all over your pictures! As soon as I have more time I'll definitely have a go with these. So exciting!
ReplyDeleteI will have to make this one late. It looks like so much fun to twist and steam! I'm impressed that you made it three times!
ReplyDeleteKaren,
ReplyDeleteThis was a lot of fun. Everyone thought that they were delicious. Thanks. Anne Marie
@Soepkipje & Natalia: have fun with it, this really is a quick one but tasty! (Oh Soepkipje, I tried but can't comment on yr pics, sorry!)
ReplyDelete@Anne Marie: you already did them? Wow! I'm coming over.
This one was really fun, and very pretty. I loved how white the buns were in contrast to the red and green filling.
ReplyDeleteThank you for picking these buns to make. They were quite easy to do and very pretty as well.
ReplyDeleteMy post is at http://mydiversekitchen.blogspot.com/2009/09/xiang-cong-hya-juan-bao-chinese-flower.html
Mooie uitdaging, Karen, goed bedacht. 'k Kan helaas niet meedoen, want ik heb geen stoompan en ook geen bamboemandje. Had ik het wel gehad, had ik de uitdaging zeker aangenomen, want het ziet er heerlijk uit!
ReplyDeleteThe good thing is that I finally bought the steamingbaskets. I was not so fond of the buns, maybee needed more chili. The fun thing is that we shape cinnamon buns this way in Sweden.
ReplyDeleteThe link is here:http://karinskitchen.blogspot.com/2009/10/chinese-flower-stem-buns.html
Hi, I just finished the post :-) . Thanks for a great recipe. We loved it.......key is the flour, I think. Here's the link to my post http://charchechaukeke.wordpress.com/2009/10/05/chinese-flower-steam-buns-xiang-cong-hya-juan-bao/
ReplyDeleteThese look amazing! And, as is normal, I am once more foiled in my hope to be labelled a babe. (Are my chances better if I say that I'm steaming mad that I missed the deadline AGAIN and won't have a chance to try these soon?) But they are bookmarked because I'm really intrigued.
ReplyDelete-Elizabeth
Great baking and steaming! Funny that bread books don't include steamed dough recipes (except Boston Brown Bread). If you're interested in a meat-filled bun recipe, check out my goat buns at www.savortheearth.com. I'm glad I found your blog!
ReplyDelete